Sunday, April 4, 2021

Repairing a Lawn Tractor Muffler - A Tale of Baling Wire and Bubble Gum

My muffler is broken!

When springtime comes a not so young man's thoughts turn to lawn care. 

And so this weekend I hauled my old lawn tractor out from its winter hibernation.  After giving the battery a quick charge and adding some fresh gas to the tank, I started the old girl up for the first time this year. 

I've had this tractor for about 10 years and it always provided faithful service in keeping the grass around the house nice and trimmed. 

So I was a bit bummed out when, after starting the engine I was greeted with a metallic clang and a really loud noise coming from the engine,. 

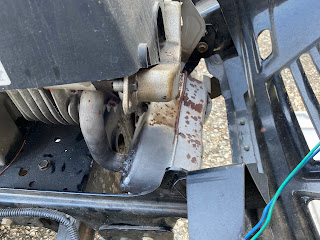
Hopping off the tractor, I immediately found the cause. On the ground, in front of the tractor, I found a large metal box - more commonly referred to as a muffler.

That's not right

On the tractor itself, where the muffler used to be was now a length of straight pipe coming out of the exhaust manifold of the engine.  

I wonder how much more horsepower I will get

Now in certain circles, I know some people would consider having a straight pipe for an exhaust system as the summit of cool, but considering that this was a lawnmower that will be circling around my property for an hour or 2 each week, I don't think my neighbors will think it very cool to run without a muffler. 

Running to the computer I did a quick search for what a new replacement muffler would run me.  I was a bit shocked. at what I found. 


A new OEM muffler was going to cost me over $100 once I factored in the shipping costs. To add further insult to injury, the muffler was also on backorder so it would be a while before I got it if I did order it. The fact that it was on backorder also told me that this was a fairly common wear item for my tractor. 

I was not very keen on shelling out $100 for what was basically a metal box. Secondly, I had visions of the muffler arriving in the fall, after a season of me slowly going deaf from cutting the grass. 

Trying to figure out my options, I took a closer look at the muffler parts. 

Pieces of mufflers

Structurally, the muffler looked to be in really good shape, there were no obvious rusted-out areas on it or the exhaust manifold pipe, and the metal still had almost all of its silver paint still on it. 

Looking closer at where the pipe attached to the inlet of the muffler, I noticed that it appeared to have a pretty clean break at the opening. 

Pretty clean break

Looking at the end of the pipe, I also noticed the remains of a welding joint, which provided more evidence that the pipe was welded to the muffler's intake. 

In essence, the muffler fell off because the weld failed on the joint between the pipe and the muffler. 

So the solution to this problem is to reweld the pipe back onto the muffler, a far cheaper, and quicker option than buying new. 

To start the repair, I first removed the exhaust pipe from the engine, which was easily done by removing two Torx-headed bolts.

Removing the pipe from the engine

When I removed the pipe, I noticed that there was a metal gasket sandwiched between the pipe and the engine, To avoid losing it (and the bolts for that matter) I temporarily reinstalled the gasket back onto the engine, securing them in place with the bolts. 

Temporarily installing the bolts and gasket for safekeeping

With the pipe removed, I gave it a test fit back onto the muffler, confirming that it was indeed a weld failure since the welded seam on the pip fitted nicely in the opening of the muffler.  

Pipe removed

This should be a fairly easy thing for your local welding shop to patch up. 

However, a few years ago I had bought a little MAP-OXY gas welding/brazing torch on sale for around $50. Other than a quick lesson in a grade 8 shop class, I never really learned showed to weld and it is always something I want to learn how to do. 

MAP-OXY torch

Since I am a real newbie to welding, I figure anything that I would do would look really rough, so I apologize beforehand to any welding experts for my shoddy workmanship. But since the muffler will be hidden underneath my tractor's hood, I figure my sins will be hidden from view. 

First I positioned the pipe into the muffler so that it sat into the intake of the muffler and stayed in place. 

Ideally, some sort of vice would have been a better option, but since this was a "driveway" repair, I had to make do with what I had. 

Getting ready to weld

Next, I hooked up the torch, put on some welding goggles, turned on the MAP gas and I sparked up the torch. 

Ready to go

Once the torch was going, I slowly turned on the oxygen until I got a nice Neutral flame on the end of the torch 

Proper flame for welding
Next, I heated the seam of the pipe and muffler with the torch until the metal glowed red and I then filled in the seam with a copper brazing rod. I keep going around the seam with the torch and rod until I could no longer see any gaps in the seam. 

Heating the metal

Like I said, it wasn't pretty, but a couple of test hits with a hammer showed that at least the pipe was now solidly attached to the muffler. 

Not pretty, but functional

Once the muffler cooled down, the final step was to reinstall the muffler back on the tractor by reattaching the straight pipe back onto the exhaust manifold of the tractor, making sure to have the gasket installed between the engine and the pipe and making the bolts as tight as possible. 

Bolting the muffler on the engine

Muffler installed

When I started the tractor again, things were a lot more quieter. Over the course of the season, I will be keeping an eye on the muffler. 

Since this is definitely a known failure point, there is a potential that I may need to do a mid-season patch up (though I hope not!), however as I have found out, it's a pretty quick fix. 

No comments:

Post a Comment