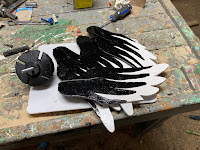
I wasn't quite sure how it would all turn out, so I built a very basic prototype that was really more functional than decorative.
I was really please with how the prototype looked and worked in the wind, but the true test was to see how it would last over an extended period of time.
The bare wood version of my prototype definitely was not conducive for surviving very long in the elements.
When decorating the duck I wanted to keep as close to the original design as possible and maintain the original look of the duck as much as possible.
Luckily, the plans in the magazine included a scale painting diagram on which made things much simpler.
All I needed to do was to enlarge the images to full scale and after printing and pasting them onto some cardboard I can cut out the painted wing designs to use as a template,
In the original plans, the duck was painted in a white and dark blue color scheme. The nice thing about this sort of design is that you can mix things up a bit with any color combination that you want. I didn't have any dark blue paint on hand, but I did have a decent amount of black paint in the shop, so I figured that a black and white duck versus a blue and white duck would look alright.
To start, I first gave all the parts a couple of coats of gloss white oil base paint.
Once the white paint had completely dried, I started painting on the wing details. I took the wing template that I had printed out and overlaid it on top of a wing.
Using a pencil I then traced out the edges of the template on top of the wing.
Taking a fine-tipped artist's brush I then applied a coat of gloss black oil-based paint along the edges that I had traced and filled in the rest of the wing.
Once the paint had dried, I flipped the wing over and painted the same design on the other side of the wing.
I continued the same approach with the remaining 3 wings.
While the wings were drying, I when ahead and traced the template for the body and painted in the design for the duck's body.
In the original plans, the eyes for the duck were made from thumbtacks. While certainly an option, I decided to paint the eyes instead, which I did with the black paint and the artist's brush, taking great care to make the eyes as round as possible.
When the wings were dry, I started the final assembly by inserting the wings into the slots on the hub that I made with my 3D printer, making sure that the wings were in the same orientation as each other.
Since I found that the friction fit of the wings into the slot was quite tight, I decided to forgo gluing the wings in place - though I may revisit that later on in the summer if I find that the wings are starting to get loose.
Next, I applied a bit of wood glue into the holes on each end of the duck's body and I threaded the rod that I had installed into the hub last week into both ends of the duck's body, making sure that I had at least a couple of inches of thread into each half of the body.
As a final step I gave the duck's bill a coat of orange exterior paint and the duck was ready to fly to its permanent mounting spot.
Of course, I needed a bit of a breeze to make sure it still worked OK.
So, now comes the hard part, I need to wait and see how durable my design is over the course of the season. I am not too worried about the wooden parts of the whirligig, but I am a bit curious about the durability of the 3D-printed parts of the project. I am not sure how durable the plastic is in the weather, especially when exposed to the sun's UV rays.
I'll give an update on how things went in the fall.


No comments:
Post a Comment