In my last post, I talked about the new toy that I had gotten myself for Christmas.
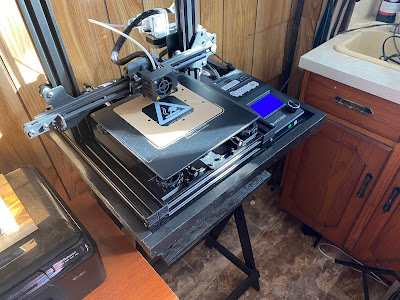
While I really do enjoy trying it out and making parts for some projects that I hope to feature here soon, I did have a bit of a problem with it. At the moment it's sitting on a countertop here in my home and it's starting to get a little in the way of the day-to-day activities in the house.
I really needed to have a more dedicated place to put my 3D printer.
The simplest solution was to find a pretty simple stand that you could probably pick up at the local Walmart or even a simple "box" made out of wood would do.
Over the past weekend, I was doing a bit of a clean-up of my lumber stash in the shop and I noticed that I had a rather large selection of odds and ends wood pieces. These pieces were typically either odd shapes or widths (like thin strips of plywood) or were materials that I usually would not use - like slabs of particle board that I had salvaged from old flat-pack furniture.
I never had the heart to pitch those parts, since they were in good shape and I always kept telling myself that I would find a use for them someday. Unfortunately, someday never really arrives, so those wood outcasts just stayed piled up in the corner of the shop, neglected and forgotten.
So, I decided to challenge myself to find a new life for those forgotten ones - I would challenge myself to try and make some sort of stand for my 3D printer out of them.
Part of the challenge was to not really follow a strict plan of construction (though I would have a basic concept sketched out as a starting point) and I was to use only the scrap wood that I had - my supply of "good" wood was to be off-limits.
While it is only going to be a tool stand, it will be also sitting in my house. So while it doesn't necessarily need to be built like fine furniture, it should at least look somewhat attractive.
With that in mind, I set about coming up with my concept.
My 3D printer had a footprint that was roughly 16 inches by 18 inches in size, which meant that was the minimum size that I needed for the top of the stand to be.
In surveying my woodpile, I had a piece of particleboard that was roughly that size, but I also had many 2 inch wide strips of 3/4 inch plywood, some 1/2 inch thick deck boards leftover from a pallet that I had disassembled, and a few squares of 3/4 inch plywood left over from my desk and aquarium stand builds.
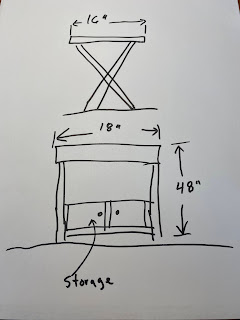
Based on what I had, I sketched out a stand concept that had a trestle table type design that was about 4 feet high (roughly the length of the pallet deck board).
Since the stand would be a bit top-heavy with the printer sitting on it, I thought about adding some sort of storage shelf or container that I could use to store my printer tools and extra filament in addition to providing some extra stability.
With that in mind, I did a quick napkin sketch of the stand.
I started the build by building the top of the stand first.
I took the piece of 3/4 inch thick particleboard that I had on hand and cut it down to a size of 16" X 18". The particleboard itself was definitely strong enough to support the printer, but the printer may move a bit, so I wanted to make sure that it strayed securely in place on the stand by making the stand top have a bit of a tub for the printer to sit in.
To make the tub I decided to make use of some of the plywood strips.
To make the tub, I cut the strips to two 16 inch strips and two 19.5 inch strips and attached the two 16 inch strips along the 16-inch edges of the particleboard with some wood glue and brad nails. I then attached the 19.5-inch strips along the other side of the board so that the edges covered the ends of the 16-inch strips.
The strips should be flush to the bottom of the partial board so that I had a 1.25-inch lip around the top of the board.
With the basic top of the stand built out, I then turned my attention for a moment to the legs of the stand.
Taking a couple of pallet deck boards, I ripped them down on the table saw so that I had many 2 inch wide strips. Four of the strips will be used as the legs of the stand but also I wanted a few extra strips on hand, just in case I make a hash of the legs, or for another possible use later on in the build (which proved to be true later on!)
Putting the legs aside for a moment, I went back to the top of the stand and pondered how I was going to attach the legs to the top of the stand.
I still had a good number of 2 inch wide strips of plywood around, so I really wanted to utilize them somehow to make a mounting point for the legs.
After some experimenting, I figured I could create a mount by attaching 2 strips of plywood along the short ends of the top. The idea would be that the legs would sandwich in the middle of the two strips and be secured to the strips with some glue and brad nails.
I cut four strips to a length of 16 inches and attached 2 of the strips to the bottom of the stand such that they were parallel to the edge of the stand top. Those strips were secured in place with glue and brad nails.
To position the second set of plywood strips I took one of the 2 inch wide strips of pallet that I had just cut out and placed it against the inside of the strip that I had just installed on the bottom of the stand's top.
I then placed the other strip against the pallet to create a bit of a wood sandwich, secured the second plywood strip in place, and removed the strip of the pallet.
With the mounting rails in place, I finished off the table mount by putting end caps at the end of the rails with four 2" X 2" plywood cubes which I then sandwiched into the ends of the mounting rails.
With that, the mounting point for the stand's legs was finished.
I next looked to installing the legs to the bottom of the stand's top. To make the trestle pattern - where the legs criss-cross halfway down - I needed to have the ends of the legs cut at an angle to make that happen. I did try out a few different angles with varying degrees of "looking correct" when I did a test fit on the stand. I ended up cutting the ends of the legs at a 15-degree angle to get the correct look.
With the angle sorted out, I installed the legs into the bottom of the stand by seating one end of a leg into the channel in the mounts on the bottom of the stand's top, making sure that the legs were seated against the end caps on the mount and that the legs pointed inwards when the edges were seated against the bottom (creating the criss-cross pattern that I needed). Once the legs were in place, I secured the legs to the mount with some wood glue and 2-inch brad nails through the sides of the mounting rails.
When the glue had dried, I set the stand up on its legs and assessed my progress so far.
It was definitely starting to look like a tool stand, but it was also very wobbly.
To counter the wobble I started by adding additional bracing at the bottom and midpoint of the legs
I did this by measuring and cutting out four pieces of the extra strips of pallet (I knew they would come in handy!) and installing them near the bottom of the four legs of the stand, creating a bit of a box shape.
Likewise, I cut another length of the pallet and attached it between the legs at the point where they crossed over - approximately at the midpoint of the stand.
With the stand now at less of a risk of collapsing, I took a moment to try and pretty things up a little and I covered the exposed end grains of the plywood "tub" with some leftover veneer tape that I had sitting around, which was applied with a little bit of heat from an old clothes iron.
With the basic structure of the stand now put together, I now had to figure out where to place my tool storage compartment.
In my original sketch, I had the compartment low on the stand, mainly to aid in the overall stability.
However, now that I have basically a working model in front of me, I quickly determined that with the additional bracing that I put in place, the stand was actually already pretty sturdy.
This meant that I now had the option of placing the tool storage a little closer to the working end of the stand at the top.
While I initially sketched out a small storage cabinet for the stand, since I am now going to be moving up the storage location on the stand, I also decided to make things a bit more simplified and make a simple shelf for storage.
Doing a quick revised sketch, I figured that locating the shelf about 6 inches underneath the top of the stand would be a good solution
The shelf itself would be made from a scrap piece of 14.75" X 14.75" 3/4 inch plywood.
Attaching the shelf did have a bit of a complication. By the nature of the trestle leg design, the crisis crossing of the legs meant that one leg was always in front of the other leg at the crossing point.
This meant that when I inserted the shelf underneath the stand, I had a nice tight fit on one set of legs, but a half-inch gap on the other set.
To rectify the situation, I cut 2 small spacers out of a strip of the pallet and attached them to the "wider" legs on the stand at the location where I wanted to install the shelf.
With the spacers installed I then cut out two pieces of a 6-inch length of scrap 1X2 pine, cutting a 15-degree angle on each end to match the angle of the legs, and attached them inside the legs of the stand, which will serve as the support for the shelf.
I attached the shelf supports to one end to the spacer that I had just attached and the other end directly to the other leg, making sure that the strip was squarely aligned with the top of the stand
After that, I set the plywood shelf on top of the shelf supports and secured it in place with glue and nails.
Once the glue had dried, the stand's construction was done.
While I did say that I wasn't intending this to be a fine piece of furniture, I did want to have it look somewhat presentable. Since I was using pallets as part of the construction, there were a few holes in places where nails were used for holding the pallet together.
I was planning on painting the stand, so to cover the holes I just filled them in with some wood putty and lightly sanded the holes flush.
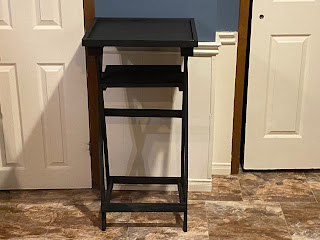
Finally, I gave the stand a couple of coats of black paint. To mask some of the rougher spots of the wood, I used a hammered textured paint, which gave the stand an overall texture of case iron.
Overall I was pretty pleased with the end result, considering I only used wood that was more or less scrap and a plan quickly drawn on a piece of paper.
So far the stand has been working beautifully, the 3D printer is a perfect fit for the top and I find that the height of the stand is the perfect working size for me. The total cost was practically nil since it was only scrapped wood - not a bad outcome!


No comments:
Post a Comment