Last week I chatted about looking into the past and reviving projects that seemed to have been lost in the mists of time.
One such project, which I found in the March 1963 issue of Popular Mechanics, addresses a problem that I actually have today, so it seems very interesting that a solution to my problem was found, and basically disappeared 57 years ago.
I live in a rural area that still relies on my local postal carrier to drive up and down the road and deposit my mail in a rather traditional box at the end of the driveway.
While very convenient and I on occasion get to have a friendly chat with my local mail lady, I do have one small annoyance with the arrangement (well, 2 actually - the first one is that the local road plows tend to knock off my mailbox each winter!) - when my mail is delivered, the practice is to raise up a little red flag at the side of the mailbox to indicate that the mail has arrived.
The issue is that my mailbox is situated in such a way that I cannot easily see if the flag is up, and sometimes I make the trudge down my driveway in the rain to an empty mailbox.
While the solution outlined in the Popular Mechanics article still won't solve my issue, it did spark an idea to give this solution a 21st-century upgrade.
Why don't we make the flag wireless?
The solution is very much an off the shelf one but would require some minor electronic surgery and a couple of electronic parts that can easily be harvested for other dead electronics that I had hanging around.
The heart of the project is a cheap wireless doorbell that I got on sale at my local hardware store. To make sure I had the range that I needed - I made sure that the doorbell had a range of at least 150 feet. Though if I find out that I need more range, I figure that I could extend the built-in antenna on the doorbell transmitter a little bit - but we would have to play that by ear and I'll provide an update in a future post if I have to do that.
The other two pieces needed for the project is a reed switch and a strong magnet.
The reed switch is something that I had scavenged from an old printer and it was originally used to detect when the printer ink door was open. The switch turns on whenever it is near a magnetic field.
The magnet was likewise liberated from a defunct hard drive. I looked specifically for this type of magnet since the magnets that are used in hard drives are very strong - which is needed since there will be some distance between the reed switch and the magnet.
My plan is to rig up the doorbell such that it is connected to the reed switch.
In turn, the magnet would be attached to the flag of the mailbox. The idea will be that the reed switch will be located inside the mailbox in such a way that the doorbell will ring whenever the flag is raised.
The first trick now is to somehow hook in the reed switch to the doorbell transmitter.
The doorbell transmitter is contained in a plastic enclosure that has a removable hatch in the back, mainly to allow access to the battery for replacement.
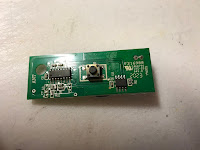
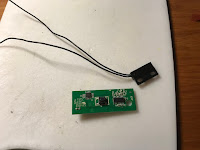
With the battery hatch removed. I did see that the transmitter was a self-contained circuit that was held to the enclosure by one screw. After removing the screw, the transmitter came out in one piece.
The transmitter is activated by a push-button switch that is soldered to the front of the circuit board.
When I short-circuited 2 of the contracts on the switch with a paper clip, I found that I could get the doorbell to chime.
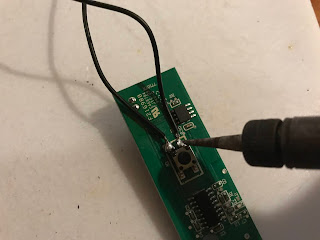
So, the plan is to solder the leads of the reed switch to those 2 leads.
This was a pretty easy thing to do with a soldering iron, though I did have to be a bit careful that I didn't short the connections with solder since the leads on the switch were pretty close together.
After I had everything soldered up, I did a quick test with the magnet to make sure that it was working as expected.
With the connections made and tested, it was time to button up the transmitter.
To allow the needed clearance for the wires going to the reed switch, I needed to add some additional clearances to the back of the enclosure. I did this by cutting in 2 small notches in the battery access panel.
That completed the electronic upgrades to the doorbell, now to see if it would actually work on my mailbox.
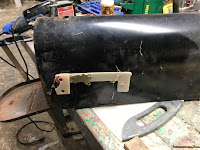
As a test, I started by taping the magnet to the flag on my mailbox and I attached the reed switch to a small block of wood with some duct tape, securing it inside the mailbox in a location where the magnet would pass in front of the switch when the flag is pulled up.
Will it work?
Yes, yes it does/.
One thing that I did notice was that the mailbox, being metal, did act as a Faraday cage if the transmitter was located inside of the mailbox, preventing any signal from being transmitted to the doorbell chime.
As a result, I needed to extend the wires on the reed switch so that I could locate the transmitted to outside of the box, which I attached to the bottom of the box to keep it out of the weather.
Since we are in the middle of winter where I live, I left the tape in place - so it's not pretty, but I'll consider this as more of a proof of concept than a finished product at this point in time.
I still do have some concerns about the impact the metal skin has on the effectiveness of the magnet, so I do plan to look into a nonmetallic option for the mailbox, which would also allow me to put the transmitter inside the box and out of the elements.
Additionally, I have some Neodymium magnets on order which should be far stronger than my hard drive magnet - so we'll see if I can improve things a bit more.


The information is helping me to use this transmitter on many ways. Will test the range of it in a few days with my Ring door bell.
ReplyDeleteKB that is me.
ReplyDelete