Tuesday, December 21, 2021
Project Basket Case - Giving Things a Nice Coat of Paint
Monday, October 11, 2021
Project Basket Case - The Saga of the Stubborn Wheel
Wednesday, September 1, 2021
Project Basket Case - Wiring It Up
Monday, August 2, 2021
Project Basket Case - Installing a New Engine in the Garden Tractor
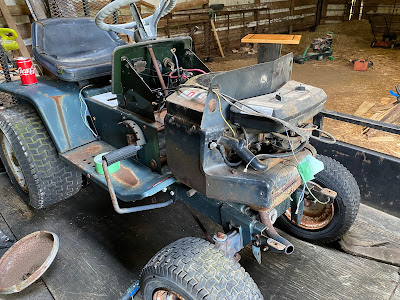
In my last post, I just successfully removed the old engine from my basket case garden tractor, which left a fairly large empty space in my tractor's front. While that made the tractor a possible candidate as a soapbox racer, I really needed to replace it with another engine.
Sunday, July 18, 2021
Project Basket Case - Engine Removal on the Garden Tractor
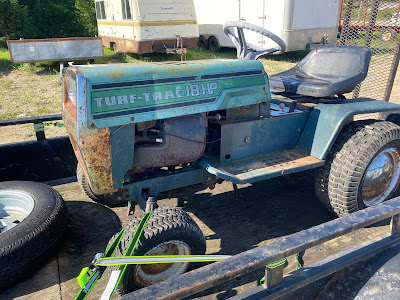
Last week I dragged home an old garden tractor that I had picked up at an auction for around 100 dollars.
In some respects, this old tractor was a bit like Charlie Brown's Christmas tree. It certainly didn't look very good, but if you looked at it hard enough, you could see something that could really be something special, perhaps all it really needed was just a little bit of love.
One thing that it did need for sure was some engine work. The tractor had a vertical twin-cylinder Briggs and Stratton engine on board that seemed to turn pretty easily and showed some signs of compression when I turned the engine over by hand at the auction.
Sunday, July 11, 2021
Project Basket Case - Trying to Resurrect an Old Garden Tractor
Well, it started off as a desire to grow some pumpkins.
With all of the pandemic issues that are swirling around, it has been taking its toll on the local community events that usually occur around my local area.
One significant event (at least to me) is the local agricultural fair that is usually held this time of year. For obvious reasons, the fair is canceled this year, but to at least keep the spirit of the fair alive, the local agricultural society decided to hold a series of virtual events.
One of those events was a competition to grow the largest pumpkin. That was something that definitely intrigued me, so I signed up, collected a few pumpkin seeds, and started growing my large pumpkin.
While it's fun to grow large gourds, the vines do take up a great deal of space in the garden. This requires a lot of tilling around the plants to keep the weeds at bay. Cultivating by hand is a bit of a chore and to be frank, I don't consider it one of my favorite things to do.
Due to the larger than normal space that I needed to keep tilled, I figured that making some sort of tow behind a cultivator that I could pull with a small tractor would be a nice project while I was waiting for the plants to grow.
Tuesday, June 29, 2021
Making a Super Simple Planer Knife Sharpener
Last week, I talked about my neverending frustration in keeping the blades on my surface planer nice and sharp, which was creating a situation where my favorite tool was quickly becoming my most hated tool.
After searching in vain for an off-the-shelf sharpener, I quickly came to the realization that I needed to make my own tool if I ever wanted to sharpen my knives. Thankfully, I found out online that many people had the same issue that I had, and I was able to find many tutorials on how to build a jig that should make sharpening knives quick and easy.
I found that everyone had their own special approach to building their jigs, all with varying degrees of complexity. Most jigs were designed so that they would be able to handle a variety of different-sized planer knives, so often they had built-in locking features that locked the knives in place as you sharpened them.
In my own particular case, I am always going to use the same size knife in my planer, so I didn't really need to have a jig that needed to accommodate different blade types, which meant that my jig should be fairly simple to build.
Sunday, June 20, 2021
The Bane of My Existance
Well perhaps that's a bit too strong, but I do have a bit of a love-hate relationship with my planer.
I love how quickly and easily it levels out wooden boards to make them nicely flat and perfect, saving me many hours of sanding. That is until the knives on my planer start getting dull.
Sunday, June 13, 2021
Wrapping up the Tweeting Weather Station - 3D Printing a Stevenson Screen
Now that I had all the pieces of the weather station now all put together and tweeting out the weather conditions inside of my home, it was pretty neat to see in action, but alas, not very useful. In order for the station to be truly useful, I really needed to have the sensors outside of the house.
The issue with anything electronic is that they don't really take exposure to the outside elements very well, however having them sealed inside a box won't provide any accurate readings. The solution is to have the sensors housed in some sort of container that will permit the entry of the outside air in order to get the most accurate temperature and humidity readings, but prevent nasty stuff like rain and snow from getting inside.
Sunday, June 6, 2021
Building a Tweeting Weather Station - Hooking Things up to Twitter with Python
The ultimate goal in all of this was to have the data from the weather station end up being fed to Twitter so that I can see what the weather conditions like at home from almost anywhere.
To do this required doing a little bit of magic involving using some Python code to create a bot to feed my data and setting up an API on a Twitter account to allow Twitter to talk to the bot.
Sunday, May 30, 2021
Building a Tweeting Weather Station
Sunday, May 23, 2021
A Wee Break in the Programming
This week is a bit of an odd one, for I don't really have a project to share this week.
Oh trust me, it not because the tank is dry in the ideas department, I have a long list of ideas and I have some in the hopper right now being worked on, however, I seem to have been afflicted this week by an issue that a lot of people seem to have - too much to do and not enough time to do it in.
At this particular moment, I am in the midst of working through a series of custom orders for some signs that I have been making with my laser engraver and my CNC router.
While it's been keeping me from tinkering with my next new thing, I am pretty happy to see that people are really liking what I pump out of my little workshop and that they like it well enough to shell out good money for it!
A couple of things that I am working on at the moment are for some repeat customers, so the fact that people are actually willing to come back to me to make more stuff is really exciting to see.
The other nice thing about doing custom orders is that it gives me fodder for my online shops. The rationale of course is that if someone likes a certain item, there are likely more that have the same needs. Because of this, I always make a duplicate of a custom item and post it up on the on line shop.
It's been really surprising seeing what sort of demand there has been for something that came to me as a special request from someone.
Between that and working the regular job - which is still important since I need to pay for my tools and wood somehow, I found myself with very little time left this week to work on that cool little something to showcase on these pages.
However, the custom jobs are almost complete and a new week is ahead. Time to get back into the groove 😀
Sunday, May 16, 2021
An Enclosure for My 3018-PROVer CNC Router - Part 3
Sunday, May 9, 2021
An Enclosure for My 3018-PROVer CNC Router - Part 2
Sunday, May 2, 2021
An Enclosure for My 3018-PROVer CNC Router - Part 1
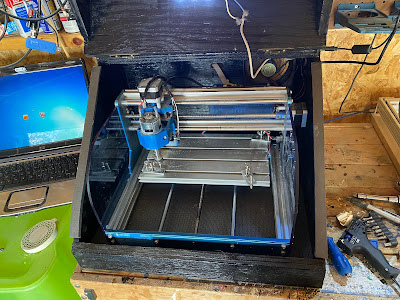
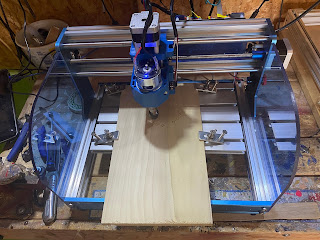
For the past month or so I have been getting a fair bit of use out of my new CNC router and I've been busily trying my hand at doing some simple projects like making some cut-out letters and Christmas ornaments as I continue to learn how to use the machine.
For all of its versatility, I did notice a few drawbacks with it.
For one, it can get a bit noisy, while not really a problem for me since I have it installed in a garden shed in my backyard, I do wonder how the neighbors feel about hearing a loud humming noise emanating from my shed.
Secondly, the router does throw up a fair bit of fine sawdust into the air while it's doing its thing and after a while, I have noticed a fine layer of sawdust has now started to coat all the tools that I keep in the shed.
Sunday, April 25, 2021
DIY Mulcher for a Lawn Tractor
Since I was in a getting ready for spring frame of mind, I figured that I should tackle a bit of a pet peeve of mine when it comes to yard work.
Anytime you see a picture of someone's lawn, whether it be in a magazine spread or a TV show, you will always be greeted with images of pristine fields of green, every blade of grass in its place.
Sadly the reality (or at least my reality) is quite different. In my particular case, my home sits on a rural property that has its sewage situation handled by a septic system that has a weeping bed that expands out into my front lawn. This creates pockets of nutrient and moisture-rich areas on my lawn, meaning that while in some areas I have a lawn that grows at a normal rate, I also have areas where the grass grows like proverbial weeds.
The issue with this comes when it's time to mow the lawn. While I have no issues cutting the "normal" part of the lawn, when I go over the turbo-charged part, I end up with large clumps of grass, making my front yard looking more like a hayfield than a lawn.
It just doesn't look good, and it bugs me to see winrows of grass instead of a pristine, freshly cut lawn.
Other than hiring out a couple of sheep to spend the summer on my front lawn (the neighbors would look at me funny), I wanted to find a solution for this.
Sunday, April 18, 2021
Taking a Wee Break From the Shop
This weekend I took a bit of a break from the shop to say hello to some folks that I hadn't spoken to for a little while.
In most cases, I have never met these people in person, and they live literally hundreds if not thousands of miles away from me, and to be honest, I need to do a lookup to see what their actual names are since I only really know them by the government issued code name that has been given to them. Likewise, they only really know me by my own special code name - which happens to be VA3ATW, and in certain circles that is the name, I go by.
Sunday, April 11, 2021
Time for an Upgrade - Moving from a 3018 to a 3018-PROVer CNC router
A couple of years ago I bought myself a pretty cheap CNC router off of Amazon, mainly just to experiment and learn how to use one in my woodworking projects.
The router that I had bought was a very cheap one based on the very common 3018 router platform, which uses an Arduino as its brain and uses the GCODE language as its instruction set. It was a very basic router and I could tell that it was certainly made on the cheap since a lot of the plastic parts, particularly the spindle motor mount was made from a 3D printer - so it wasn't necessarily made to precise tolerances. But for a learning machine, I figured it would be a good one to start with,
Sunday, April 4, 2021
Repairing a Lawn Tractor Muffler - A Tale of Baling Wire and Bubble Gum
When springtime comes a not so young man's thoughts turn to lawn care.
And so this weekend I hauled my old lawn tractor out from its winter hibernation. After giving the battery a quick charge and adding some fresh gas to the tank, I started the old girl up for the first time this year.
I've had this tractor for about 10 years and it always provided faithful service in keeping the grass around the house nice and trimmed.
So I was a bit bummed out when, after starting the engine I was greeted with a metallic clang and a really loud noise coming from the engine,.
Hopping off the tractor, I immediately found the cause. On the ground, in front of the tractor, I found a large metal box - more commonly referred to as a muffler.
Sunday, March 28, 2021
Finishing Up the Whirligig
Sunday, March 21, 2021
A Different Take on an Old Whirligig
Sunday, March 14, 2021
Building the Bargain Boat Horn
Sunday, March 7, 2021
Cup Holder Mount for a Car Voltmeter
Last week I tried out a project from an old issue of Popular Mechanics where you could make a voltmeter for your car.
Wiring up the voltmeter was actually a pretty easy project to tackle and I was able to get it up and running with a couple of hours of soldering.
As s temporary measure, I put the meter in an old plastic food container while I was out driving around.
While functional, it certainly wasn't very attractive to look at.
As I may have mentioned before, I recently got a 3D printer and I have been spending a bit of time getting acquainted with it by printing out a few "canned" 3D models that I had found online. While I did enjoy printing out some of the things that I had found, I really wanted to make my own custom parts, which is the main reason why I wanted the printer in the first place.
Sunday, February 28, 2021
Making a Voltage Gauge for Your Car - A Retro Popular Mechanics Project
While cars today are technological marvels that seem to have so many smarts built into them that they seem to almost drive themselves - I can distinctly remember when I first got my 2017 Honda Ridgeline out on a road trip and being a little freaked out at first when I would feel the steering wheel turn by itself when I was going into a curve on the road.
Unfortunately, as the cars get smarter, the less they seem to want to tell the driver how the car is doing mechanically. Many years ago a lot of vehicles had gauges on the dashboard that told the driver such pertinent details as the old pressure, coolant temperature, and battery/alternator voltage. Except for some pickup trucks, most cars these days only give you the engine temperature as a gauge, relying on warning lights when the oil pressure and voltage get too low. The issue is that by the time you see a warning light, is usually too late and you are stuck by the side of the road.
With gauges, you had the opportunity to spot trouble before it had a chance to leave you stranded. The movement of a needle on a dial off of its normal spot would always give you a clue that things were starting to go bad under the hood.
As I mentioned in one of my previous posts, I have been browsing through the back issues of Popular Mechanics magazine. The other day I was leafing through the October 1977 issue when I came across an article on building a testing tool that measured the health of your car's charging system.
Sunday, February 21, 2021
Building an Apartment Sized Workbench - Part 2
Sunday, February 14, 2021
Building an Apartment Sized Workbench - Part 1
After building a stand for my3D printer, I also quickly realized that I also needed to have some sort of small workshop space in the house.
Now don't get me wrong, I am still going to have the "big" shop, however, it is a few miles down the road from my house, and sometimes, it's just not worth the trip if I have some sort of quick or small project that needs to be done.
My 3D printer is currently sitting comfortably on its stand in a corner of my family room. Looking at where I have it located, I noticed that I just had enough space beside it for a little work area and I did have a fair bit of scrap wood pieces leftover that was still looking to be put to good use.
Looking at the space around the 3D printer, I figured that I could put it in a small work area that would be about 2 feet wide and 16 inches deep. While not a lot of space, it should be sufficient for the small projects that I had in mind.
I also wanted to make the workbench something that could more or less blend into the family room, meaning that I wanted to make it look more like a cabinet, allowing for the storage of tools and supplies within the workbench, hidden away from sight.
Due to its small size, this would make a very nice accessory for someone who lives somewhere like an apartment, but would like to have their own dedicated "shop space".
Sunday, February 7, 2021
Building A 3D Printer Stand - A Scrap Wood Challenge
In my last post, I talked about the new toy that I had gotten myself for Christmas.
While I really do enjoy trying it out and making parts for some projects that I hope to feature here soon, I did have a bit of a problem with it. At the moment it's sitting on a countertop here in my home and it's starting to get a little in the way of the day-to-day activities in the house.
I really needed to have a more dedicated place to put my 3D printer.
The simplest solution was to find a pretty simple stand that you could probably pick up at the local Walmart or even a simple "box" made out of wood would do.
Over the past weekend, I was doing a bit of a clean-up of my lumber stash in the shop and I noticed that I had a rather large selection of odds and ends wood pieces. These pieces were typically either odd shapes or widths (like thin strips of plywood) or were materials that I usually would not use - like slabs of particle board that I had salvaged from old flat-pack furniture.
I never had the heart to pitch those parts, since they were in good shape and I always kept telling myself that I would find a use for them someday. Unfortunately, someday never really arrives, so those wood outcasts just stayed piled up in the corner of the shop, neglected and forgotten.
So, I decided to challenge myself to find a new life for those forgotten ones - I would challenge myself to try and make some sort of stand for my 3D printer out of them.
Part of the challenge was to not really follow a strict plan of construction (though I would have a basic concept sketched out as a starting point) and I was to use only the scrap wood that I had - my supply of "good" wood was to be off-limits.
While it is only going to be a tool stand, it will be also sitting in my house. So while it doesn't necessarily need to be built like fine furniture, it should at least look somewhat attractive.
With that in mind, I set about coming up with my concept.
Sunday, January 31, 2021
A New Toy for Christmas Or When An AnyCubic Mega Zero Shows Up
Sunday, January 24, 2021
Bringing a Small Engine Back From the Dead
Saturday, January 16, 2021
Wooden Barn Mailbox
The previous week I posted about a wireless alert system that I had devised with the use of some surplus parts and a cheap doorbell to let me know when the mail had been delivered.
While I was happy with the concept, I was a little less than thrilled about the reduced range that I seemed to be getting when it was being used with my metal mailbox. My suspicion was that the mailbox was acting a bit like a faraday cage with the doorbell transmitter, severely cutting down the range of the signal being transmitted.
I did try to have the doorbell transmitter located outside of the mailbox, but I was wasn't too happy with the idea of having it exposed to the elements.
Since my mailbox was starting to look a little rough, I figured perhaps a mailbox upgrade, one that would be a bit more radio-friendly, would be a nice project to tackle.
Sunday, January 10, 2021
You Got Mail! - Wireless Mailbox Alert
Last week I chatted about looking into the past and reviving projects that seemed to have been lost in the mists of time.
One such project, which I found in the March 1963 issue of Popular Mechanics, addresses a problem that I actually have today, so it seems very interesting that a solution to my problem was found, and basically disappeared 57 years ago.
I live in a rural area that still relies on my local postal carrier to drive up and down the road and deposit my mail in a rather traditional box at the end of the driveway.
While very convenient and I on occasion get to have a friendly chat with my local mail lady, I do have one small annoyance with the arrangement (well, 2 actually - the first one is that the local road plows tend to knock off my mailbox each winter!) - when my mail is delivered, the practice is to raise up a little red flag at the side of the mailbox to indicate that the mail has arrived.
The issue is that my mailbox is situated in such a way that I cannot easily see if the flag is up, and sometimes I make the trudge down my driveway in the rain to an empty mailbox.
While the solution outlined in the Popular Mechanics article still won't solve my issue, it did spark an idea to give this solution a 21st-century upgrade.
Why don't we make the flag wireless?
Sunday, January 3, 2021
Going Forward By Looking Back
Recently I posted up a project that I had first built back when I was just a kid. When the memory first popped into my head, I had a vague recollection of how it worked, but I couldn't really remember any specific details on how it really went together,
One thing I did know was that I did get it from an issue of Popular Mechanics, a magazine that I was absolutely into during my elementary school days. Since we are talking about something that was built over 30 years ago, of course, I no longer had that particular magazine in my possession, nor did I have the foggiest idea in which issue that project was published.
Trying to see if by some chance someone else had the same thought that I had and managed to build the item that I wanted to make, I hit the search engines and scanned the internet for any sign of the project as I remember it.
Sadly, I couldn't find anyone out there that had built the thing, but I was rather surprised to find something even better.
By chance, I had stumbled upon the complete library of all the issues of Popular Mechanics that had been digitized and available for viewing on Google Books.
The beautiful thing was that the library was fully searchable and with very little trouble, I was able to pull up the article that had my project - exactly as I remembered it.
After getting reacquainted with this old friend from my childhood, something dawned on me.
We are very much in a world now that almost all information is available within seconds by typing in a few words on a screen. Except that isn't necessarily the case.
For the majority of the time in the past, things were written on paper, meant for primarily "at the moment" consumption - you read this month's issue, perhaps tore out a page with something you've found interesting to save, but the rest was usually put in the trash. No one really considered saving this stuff for someone in the future.
I started roaming through the other issues of Popular Mechanics, starting with issues that were produced in the 1950s.
I was immediately struck by the wide variety of things that one could make that were illustrated with those pages, that I am almost certain no one has looked at or least considered building for the last 40 or 60 years.
While some of the projects illustrated sometimes made me shudder a little bit (a dog house with asbestos insulation comes to mind). There was quite a lot that I know I have never seen before, and I know deserve to live again.
 |
| From 1964 I have never seen one of these Would be a great garden ornament! |
Likewise, I also saw some projects that utilize what would be considered fairly old technology these days (vacuum tubes anyone?) but the concepts are novel enough that one could easily put a 21st-century spin on them with a little bit of tweaking
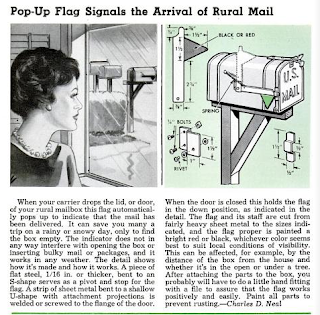 |
| From 1963 This is a good idea even for today Though I may look at adding some sort of wireless alert too |
Over the past couple of weeks, I have been browsing these old issues and I've starting to compile a list of some of the more intriguing projects that I have found.. My goal for 2021 is to awaken some of these old projects from their 50-year-old slumber and to reintroduce them to the world again.
It would be amazing to see if something from the past would seem new again.


