Now that I finished my dishwasher installation, I was now able to swing my attention back to my scanner project.
Since I had now ruled out my Raspberry Pi Zero as a credible platform for my radio receiver, I had to take another look at my Raspberry Pi 4 as the foundation for my receiver.
The Pi 4 had certainly a lot more horsepower at its disposal and as an added bonus I also had a touch screen attached to it, so this gave me an opportunity to try to have some sort of display as part of the receiver, versus just having a plain box which was my original plan.
The first problem that I needed to attend to was the issue that drove me to the Pi Zero in the first place.
I needed to figure out some other way to get sound from the receiver without that infernal hissing noise that I had from the phono plug output when the receiver is waiting for radio transmissions.
The solution for that problem came to me rather by surprise during my last scouting mission at the neighborhood surplus store.
It was there that I found some very cheap USB sound cards - which as the name implies, provides a dedicated sound card for a computer in the form of a USB dongle. The beauty of this solution is that with would eliminate having to use the "fake" onboard sound card of the Raspberry Pi.
After giving the nice cashier a few dollars, I headed home with my new acquisition.
Once I arrived home, I plugged the USB sound card into a USB port on the Pi and booted it up. The Raspberry Pi immediately recognized the sound card and when I plugged in my amplifier, I was quite easily able to play sounds through the card, with none of that annoying hiss that I was getting from the phono plug.
Now that I had the hardware issues sorted out, I now needed to figure out the software side of my receiver. Since I now had a touch screen at my disposal I didn't really want to use RTL-FM as my receiver software, since it is a terminal window only executed application, which would make for a very boring display.
Since I also had a little extra bit of horsepower with the Raspberry Pi 4, I felt that I should go all in and utilize a receiver application that had a full feature GUI display.
After some searching around, I settled on installing an application called GQRX. GQRX is a very powerful open-source SDR receiver application that has a very powerful GUI-based interface which included some nice features like a fully functional waterfall display of the frequency that you are monitoring.
Installing GQRX is pretty straight forward, but it does require a few steps to get everything installed and configured.
To do this, I had to open up a terminal window on my Raspberry Pi and entered the following command at the command prompt to install the software:
$ sudo apt-get install gnuradio gqrx
Now that all the software is installed, the last step is to reboot the Raspberry Pi, which was easily done with this command:
sudo reboot
Once the Raspberry Pi was rebooted, I plugged in my SDR dongle and activated GQRX by clicking on the Raspberry Pi icon on the top left corner of the Raspbian window, I then clicked on the Internet menu item from the drop-down menu, and then clicked on GQRX.
The first thing that pops up is an I/O configuration menu.
To set everything up, I set the input device to my SDR dongle which appeared in the device drop-down menu as a Realtek RTL2838
I then set my audio output to the USB sound card, again through the drop-down menu.
Clicking OK then put me into the GQRX main screen.
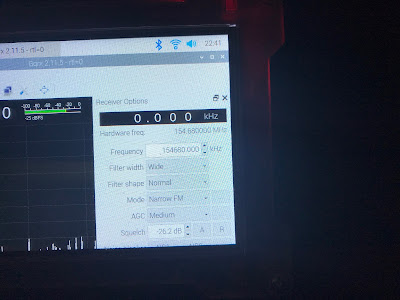
To configure the application to scan the frequency that I wanted I first clicked on the View menu item at the top of the screen and selected the Receiver option.
This opened up a pop-up window on the right-hand side of the screen.
I set the frequency to the one that is used as the dispatch frequency for my local fire department by entering the frequency value in the frequency field.
In my part of the world, the fire department uses narrowband FM to transmit, so I need to set the mode to Narrow FM (If I left it in standard FM, I just would hear a lot of static whenever there was any activity on the frequency)
Since I wanted to set a squelch so that the receiver came alive only where there was a transmission, I clicked on the Automated Squelch setting (the "A" button beside the squelch value field) which set the squelch to be just above the average noise level.
Closing the Receiver window, it was time to give it a try. It was at this point that I did have a bit of a problem with the user interface on this application. While everything was all configured and ready to go, it was not really obvious on how to get things started.After some reading of instructions, I realized that I needed to click on the "play" button at the top right of the screen - something that didn't seem really obvious to me for some reason. Once I figured that out, I had things up and running and scanning for fire calls.
So far things seem to be working well and I have had the receiver running constantly for about a week now, so I am very confident that the setup will be highly reliable.
Now that I have the mechanics all sorted out, the last step is to package everything up.


No comments:
Post a Comment