A few months back I developed a bit of a guilty pleasure in watching unboxing videos that seem to be everywhere on YouTube.
The concept is that you get a box from an online store and you film yourself opening the box, removing and critiquing the items in the box. I actually tried my hand at doing one myself with my new table saw.
Admittedly a very odd concept - but a very popular one, and strangely compelling to watch. I suppose with fewer people going to physical stores, this has replaced "window shopping".
I am especially drawn to watching unboxing videos which definitely are a spoof on the whole genre.
In particular, the videos that I watched seemed to delve into something called "Crate Boxes". Crate boxes are usually part of a monthly subscription where you get a box full of goodies delivered to your front door each month. These crates are usually geared to a particular interest (movies, video games, etc.) and the contents of the crates usually follow a monthly theme.
Most subscriptions are actually pretty reasonable for what you get - usually around 20 or 30 dollars a month.
There are quite a few of these subscription crates out there. For example, my spouse subscribes to a crate that sends her goodies for her card making hobby.
The other day, I saw a post in my Facebook feed about a crate subscription service called KiwiCo that offered something called a Kiwi Crate.
KiwiCo focuses its crates towards providing STEM, STEAM, and Science kits, mainly for kids.
While I haven't been a kid for a long long time, I noticed that they had various levels of crate subscriptions based on various age and interest levels.
I was actually surprised to see that they did offer crates for "older" kids in the 14 to 104 age range with 2 crates - a Eureka Crate that was geared towards Science and Engineering projects and a Maker Crate that was aimed towards Arts and Design projects.
Of course, I was more drawn towards the Eureka crate so I checked it out a little more.
I was actually pretty impressed with what you got in a crate. A crate usually contains a very useful item, such as an electric pencil sharpener, or an articulated desk lamp the comes in a kit form. Again the items have a heavy STEM slant as they use the assembly of the item as part of a teaching exercise.
I was actually pretty intrigued, so I subscribed for the Eureka crate, with my first crate arriving at my door a couple of weeks later.
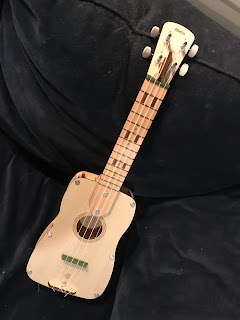
As a first project, I was sent a wooden ukulele.
Now I will never claim to have any musical talent, I do actually have some familiarity with this particular instrument since, during my tenure in elementary school, the music program there taught me to play the ukulele, so I was curious if I actually retained any that I learned.
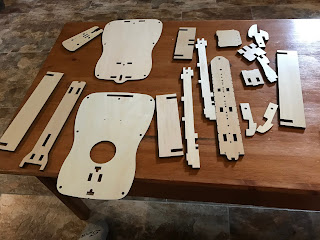
Opening up the box, I saw a fairly hefty looking instruction book and a collection of laser-cut wooden parts and various bits of hardware.
Cracking open the bag containing the wooden parts, I was immediately impressed with the overall quality of the parts. The ukulele is made from 1/4 inch furniture grade plywood which looks to have been cut to a high degree of accuracy, which I would expect from anything that would be cut by a laser.
The wooden parts ware also covered in a clear gloss finish and also had some little extra touches like a decorative rosette being etched around the ukulele's soundhole.
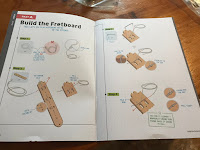
A quick perusal of the instruction manual that came with the kit had a wealth of information on the history and how to play and tune the ukulele.
The actual assembly instructions themselves were very well done, using a nice combination of written and pictorial instructions, which really cuts down the confusion factor that I sometimes get when I'm dealing with a pictures only or written word instructions.
A real nice bonus is that the manual appears to have been written by a native English speaker (either that or had a really good copy editor), which is a bit of a rarity today as a lot of manuals seem to be a literal translation from something else (I still chuckle when I see the "Do not look directly at the radio to avoid eye hurt" warning label on my laser engraver. 😀)
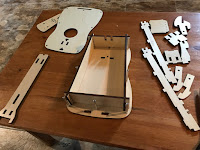
Following the instructions, I proceeded to assemble the body of the ukulele.
Due to the nature of things made from laser cut parts, the ukulele went together by fitting the pieces together by inserting various tabs into corresponding slots. For the most part, things did fit together fairly well, but I did find the occasional part that fitted a little loosely and tended to fall out before I had a chance to secure it in place. It could pose a source of frustration for someone with a shortage of patience - definitely not made for young kids to assemble.
Eventually, I got the body of the instrument put together and it was starting to look like something that I could recognize.
One thing that I was pleasantly surprised to find was the overall quality of the tools that were included with the kit.
In particular, there was a stubby screwdriver that was included to assemble the ukulele's body. It was a very robust tool that had a fairly heavy-duty bit with a very substantial handle. This is a marked departure from my previous experience with kits, where the included tools are rather cheaply made.
This particular screwdriver will have a promising future in my toolbox.
Another thing I found need what there seemed to be built in "break" points at the end of the major build steps where a little educational tidbit for you to read in the manual gave you a bit of a break in the build.
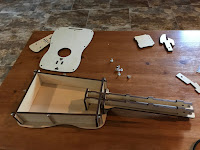
The next step in the construction was to install the various bits of hardware that are needed to attach and tighten the strings on the instruments.
Again, I was pretty impressed by the overall quality of the included parts and continuing the follow the instructions, the rest of the ukulele came together easily.
The only hiccup that I had came when attaching the strings to the body of the ukulele. The instructions showed a particular method of attaching the strings that did not entail a physical knot but rather a method of winding the strings so that they tightened up as more tension was applied to the string. I am assuming that is a standard technique for attaching guitar strings.
No matter how I tried, the strings just didn't tight down and eventually, they just slipped off the ukulele. Tying a simple knot fixed the issue.
Within 45 minutes of work, I had a fully functioning ukulele.
It even sounds pretty good.
So I would consider better good as far as crates go - I'm definitely going to keep subscribing!






No comments:
Post a Comment