Every Father's Day I always have the same issue, what do you get for a Dad that already has every conceivable tool and gizmo you can think of? (mind you, I have also noticed that my kids have a similar problem).
Most years the situation was solved with the purchase of a gift card from his favorite tool emporium, but even that gets a bit stale after a couple of years, and you end up back at square one again.
In the past couple of years, my Dad has started to have a few mobility issues which could be greatly helped with some regular exercise of his legs.
A neighbor of theirs recently got an elliptical trainer for this exact same purpose and they claim that it made a world of difference for them. Grabbing onto this as the perfect gift for Dad, I did some online shopping for something similar.
After quickly noticing the $500 - $1,000 price tag, I quickly had to do a bit of a rethink. While my father is certainly worth the cost of such a machine, I did have a bit of issue about paying that much for what was basically a fancy box with pedals sticking out of it. - effectively a fancy unicycle that doesn't go anywhere.
From what I could gather, the basic premise of the trainer is to provide a low impact way of giving the benefits of riding a bicycle, including providing a measure of pedaling resistance to build leg strength.
Rummaging through the back of the shed, I found exactly what I needed - a small bike that my kids used when they were small - more years ago than I would like to think.
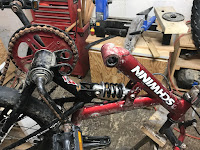
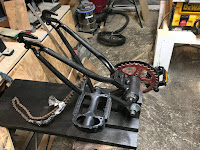
This particular bike had a 2 piece frame where the pedals, chain, and back wheels were all contained on their own subframe.
The basic idea for the trainer would be to separate the pedal and rear wheel assembly from the rest of the bike and mount the whole assembly onto a mount that would then sit on the floor, allowing the user to pedal in comfort and safety.
The first that I did was to separate the 2 halves of the bicycle, which was basically a simple matter of removing the two bolts that connected the two parts together
With the bolts removed, the pedals and rear wheel came off as a complete assembly.
The next step in the process was to figure out how I wanted to mount the rear assembly of the bike.
After some playing around, I figured the best way to mount the bike was it have it mounted upside down with the rear wheels pointed upwards at about a 45-degree angle.
In order to allow for the proper clearance for the pedals so that they don't hit the floor when in use, the whole assembly should also be a couple of inches off of the floor.
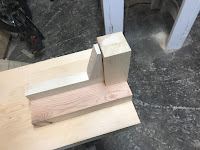
Once I had that sorted out I started building the mount for the elliptical trainer by first cutting out a 3-foot length of 2 X 10 spruce which will serve as the base of the mount.
To provide a couple of inches of clearance for the pedals, I then cut out a six-inch length of 2 X 4 spruce which I then glued and nailed in place in the middle of one end of the base.
Next, I needed to start building the mounting points in order to attach the bicycle frame to the base of the trainer. I started with the mounting point for the part of the bike's frame that was located near the pedals.
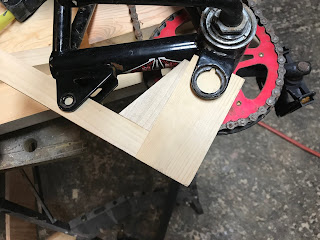
Since the bike frame will be mounted upside down and to maintain that 45-degree angle for the rear wheels, I determined that the mounting point needed to be about 6 inches in length. Also, the mount will need to fit between the mounting points on the frame. Measuring between the points, the amount needed to be about 2 inches in width.
With those dimensions, I cut out two 6 inch long pieces of 1X2 hardwood and glued them together to make a 2 X 2 block.
Once the glue was dry I secured it to the base on top of the 2 X 4 block that I had attached earlier.
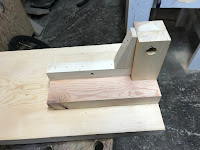
In order to create a mounting point for the bottom of the bike frame I then took a piece of 1 X 2 hardwood, cut it to length, and attached it to the base such that it was abutted against the 2 X 2 block that I had just installed such that it formed an "L" on the spacer.
As an additional bit of reinforcement, I cut a small wedged piece of wood and attached it to the 2 mounting pieces.
Once the mounting pieces were complete, I then gave the bike frame a quick test fit and marked the locations for the holes I needed to drill into the mounts in order to attach the frame.
Next, I drilled the appropriately sized hole (in the case, a 3/4 inch hole for the mounting point at the bike's pedals and a 1/4 inch hole at the other mounting location) at the spots that I had marked.
After one last test fit to make sure things fitted together properly, I then gave the base and the bike frame a good coat of black paint.
Finally, it was time to put everything together.. I reinstalled the frame back onto the base and permanently attached it in place with a 3/4 inch bot at the top and a 1/4 inch bolt at the bottom of the frame.
The final step was to try it out.
My father has been using this for a few months now - it's actually has become part of his nightly routine to pedal away while he watches television.
I've been pretty impressed with how well the trainer has been holding up from the constant use that it was been receiving.
Compared to the $500 price tag that we were seeing for elliptical trainers in the store, this particular trainer cost me about $10 out of pocket, with the scrap wood and the old bike being free. Even if I didn't have a bike on hand, I could have easily picked up one for under $10 at a local garage sale.
The nice thing was, my dad had a useful, handmade gift for Father's Day - a definite departure from the gift card!









No comments:
Post a Comment