In my last post, I had just completed building the top of the aquarium stand.
One of the key items that I needed to figure out for the stand was the overall dimensions of the aquarium that I would be using, the reason for that is that it dictated the overall dimensions for the top of the aquarium stand, which in turn determined the size of the body and base of the stand.
So with the top sorted out, I started working my way down, making next item on the agenda building the body of the aquarium stand,
The design of the stand was that the body of it was going to be basically a large box with some internal storage in order to allow for stashing fish food and other supplies. The box will also need to be built heavily enough to support the weight of the aquarium when it's full of water (which could weigh over 100 pounds).
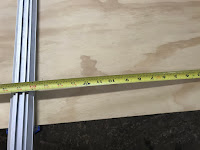
I first started by cutting out the sides of the box from my sheet of 3/4 inch plywood. The width of the body should be the same width as the top of the stand which was 15.5 inches.
Marking that out on the plywood, I cut out a 15.5 inch wide and 4-foot long strip of plywood.
Next, I marked out two 23.5 inch sections of the plywood it had just cut and cut out two 23,5 X 15.5-inch boards.
Next, I cut out the back of the body. I wanted to have the top of the stand to have a 6-inch overhang from each side of the body (meaning the body will be about a foot narrower than the top.
To determine the width of the back, I took the length of the top (27.25 inches) and subtracted 12 inches, giving me a width of 15.25 inches.
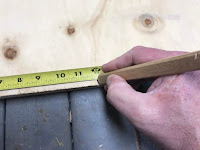
I then marked out a 15.25-inch strip on the plywood and cut out a 4-foot long strip.
I marked that out and cut a 23.5-inch piece from the strip.
With the remaining wood from my strip of plywood, I then marked out two 14 inch sections and cut out two 14 inch X 15.25-inch pieces - which will be used as the top and bottom of the box.
To attach the back to the sides I chose to use a combination of glue and wood screws with pocket holes.
To make the pocket holes I used my Kreg pocket hole jig. I first marked 2 inches in on each side of the back along the 23.5-inch sides. I then made another mark at the midpoint of the sides.
Next, I clamped my pocket hole jig at each of the spots that I had marked, and using the supplied drill bit, I drilled a pocket hole at each location.
Next, I drilled pocket holes 2 inches in on each end of one of the 15.25-inch sides and both of the 14-inch sides of the top and bottom pieces.
Once the pocket holes were drilled. the main components of the box were ready for assembly.
I first laid out the plywood pieces in order of assembly.
I then took six 1.25 inch wood screws and started screwing them into the pocket holes until they just start poking through the side of the plywood.
Next, I ran a bead of wood glue along the edge of the back of the box and attached one side to the back, making sure that the side was flush to the edge of the back. I then screwed in the wood screws until they were snug and the side was tightly attached to the back.
Next, I took the top of the body and also started 1.25-inch wood screws in the pocket holes. I then ran a bead of glue along the edges of the top and attached it to the back and side of the body. I then secured it in place by tightening it up with wood screws.
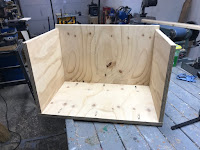
Next, I did the same with the other side piece and the bottom piece until I had what basically looked like a box with one open side.
At this point, I decided to put in a single door in the front of the aquarium stand. To allow for the installation of the door, I needed to build a frame around the front of the box in order to have a proper mounting spot for the door.
In deciding to build the frame, I also wanted to add a bit of flair by creating a picture frame effect with 45-degree corner cuts at each corner of the box front.
But in order to secure the frame components for the front, I first needed to add some supporting structure in place.
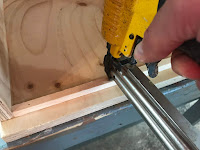
To make the structure, I cut out a number of 1/2 inch square strips from a 2 X 4 and nailed them in place along the inside perimeter of the front of the box. The strips were installed such that they were at the same height as the top and bottom of the box - they should be 3/4 of an inch down from the edge of the sides of the box.
Next, I made a mark inside the box 1 foot from the bottom and I nailed 2 more strips at those locations. The propose of the strips will be to act as a mounting point for a storage shelf.
To build a shelf, I cut out another 14 inch X 15.25-inch piece of plywood and installed it inside the aquarium stand body by attaching on top of the strips that I just installed with some wood glue.
It was at this time that I noticed that I had a bit an issue. Along the top of the aquarium stand, one of the screws that were attaching the top of the body to one of the sides had gone all the way through the plywood and was poking outside of the box.
There are a couple of ways that I could resolve this little issue since the screw is just barely poking out of the wood, so the hole was actually pretty small, I would typically just back out the screw and push any protruding wood fiber back into the hole and fill it with a little bit of neutral-colored wood filler, I would then lightly sand the surface of the plywood while the wood filler was still wet to allow the filler to absorb the resulting sawdust, blending the hole fully into the surrounding wood.
However, I decided to treat this mistake as an opportunity to add additional support for the top of the stand.
I cut out a couple of 15.25-inch boards of 1 X 4 pine that I had on hand and added a decorated edge using an Ogee bit on my router table,
To hide the screw hole, I glued the 1 X 4 boards along the top edge of the box, with the routed edge facing down.
With my little mistake now hidden from view, I turned my attention back to the front of the box.
To make the front I cut out four 2 inch wide strips of plywood - Two strips that were 23.5 inches long and two that were 15.25 inches long.
Next, I cut 45-degree angles on each end of the strips, making sure that the "long" side of the angles was on the same side of the strip and that I did not shorten the overall length when I made the cuts.
I then attached the strips to the front of the stand body by applying glue along the strips that I applied earlier with some glue and set the strips in place, making sure that the 45-degree corners make nice tight 90 degree corners
Once the front frame was in place I then covered any exposed plywood edges with veneer tape.
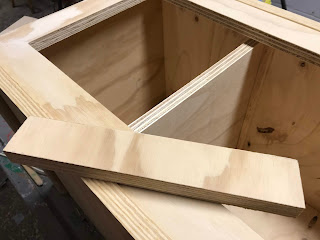
As a final touch, I then cut out a 2 inch X 11.25-inch strip of plywood and attached it to the front edge of the shelf to add a bit of a lip to the shelf while hiding the plywood edge of the shelf.
With that final piece, the construction of the body of the aquarium stand was complete.
During construction, I felt that the addition of the shelf in the middle of the body, in addition to the 1 X 4 strips at the top (thanks to my little mistake) would adding an appropriate amount of strength.
Next on the list will be building a base for the stand.














No comments:
Post a Comment