For the last couple of years, my spouse and I usually buy a large gift to each other for Christmas.
Usually, these gifts entail some sort of high tech toy like a large screen TV. The idea was that we would pool the gift budget and buy a really nice gift - of course, it had to be something we would both like (so alas, that 3-D printer that I always wanted will need to wait).
When Christmas came around again this past year, the usual question came up - what did we want to buy each other this year? Earlier that year my wife had started to get into card making and had been busily stocking her own workspace with all the various tools and supplies that she needed for this new adventure.
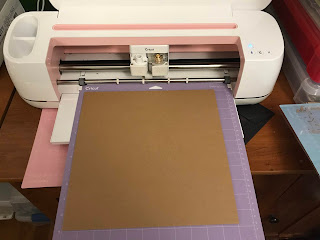
During a tool shopping expedition, she came across a new machine that was just launched by Cricut called the Maker. My wife has had some experience with Cricut in the past, but the machines that she had used were only made to only cut card stock or paper. Additionally, the old Cricuts used proprietary cartridges that cut out pre-programmed shapes and did not give you the option of creating your own designs.
The Cricut Maker was a vast departure from the old Cricut's. The Maker connected to your computer or smartphone and ran off of a web-based interface. Gone were the stock shapes and letters and in their place was an online community where you could download pre-built projects or you could create your own designs using a tool that was very familiar to the Easel tool that I use for my CNC router.
The Maker also came with a variety of cutting, engraving and marker heads that allowed one to be able to cut into everything from paper all the way up to 1/32 inch plywood.
When my wife mentioned that she would like this magical tool to me, I was immediately on board.
And so, Christmas morning brought a new toy under the tree for me to try out - albeit I did need to share it ☺
The first thing that struck me about the Maker was that it came with a lot of interchangeable tools.
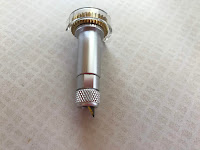
The Maker itself came with an embosser, fine tip cutter, and a felt tip marker. Since I was also interested in cutting out patterns in wood and perhaps doing some metal engraving, I also purchased a large blade cutting and engraver tool as separate items.
The Maker itself came with an embosser, fine tip cutter, and a felt tip marker. Since I was also interested in cutting out patterns in wood and perhaps doing some metal engraving, I also purchased a large blade cutting and engraver tool as separate items.
Tool changes are pretty simple since changes can be handled by dropping the tool into a cradle on the machine which then is held in place by a fairly simple locking mechanism.
The Maker actually has 2 tool cradles. While the one cradle will see the majority of use for the type of work that I would be doing and is dedicated to handling tools that used for cutting and engraving, the other cradle is purely dedicated to holding writing instruments such as felt tip markers.
The size of material that the Maker can handle is pretty generous and can handle materials that are a square foot in size. The only thing that I found to be a bit of a constraint was that Maker could only handle material that had a maximum thickness of 2.2mm. This meant that other than cardboard and paper, the Maker could only cut thin plywood, wood veneers, and soft metals.
As a first project, I wanted to try and see if I could use the Maker as a surrogate laser cutter to do a common task - build a simple box out of wood - similar to something that you would make as an enclosure for an electronics project.
There are a lot of tools out there that you can use to design laser cut boxes. A quick Google search on "Laser Cut Box Generator" brought me to the MakerCase site which I found to be a very easy site to build and design boxes to any specific size and style that you want.
Once you have designed your box, the site also has the ability to download your design as a .svg or .dxf file which can be easily loaded into a laser cutting machine.
I was very happy to see that the Cricut Maker online design tool had native support in place to import .svg and .dxf files.
Importing my box design was a fairly straightforward matter of importing my .svg file straight into the design tool.
Once the pattern was loaded up onto the tool, the next step was to have the Maker cut the pattern out on the material of my choice.
I did want to use some thin plywood that I had on hand to make my box, but I also knew that I needed to make some adjustments before I fully committed to a final design.
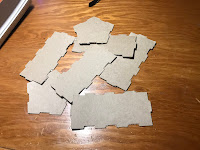
Since I didn't really want to waste my plywood while I tweaked my box prototype, I used some scrap cardboard to build my first few boxes
Once I was satisfied with my box design, I switched over to plywood and cut out the pieces for my finished box.
On the whole, I was quite impressed by how well the Maker cut out the wooden parts for my box.
The cuts were quite precise and when I assembled the box, the joints came together with a nice tight fit.
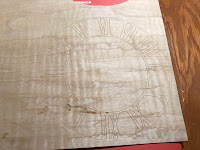
However, when it came to cutting out something that was quite intricate - such as a face for a clock project that I was working on, I did find that the Maker did have some trouble cutting something like that out on my plywood stock. Occasionally the blade would get stuck, requiring a restart of the Maker, or the plywood would sometimes break apart.
When trying to do the same thing with metal foil, I found that the metal tore very easily when trying to cut it, making a bit of a mess of things. I had much better luck engraving images into the metal with the engraving tool
To get something truly intricate I needed to switch down to a stiffer and thinner material. In order to stay within the wood criteria, I had to move down to wood veneer in order to get the results that I needed for my clock face though I did need to make some additional cuts with a modeling knife in order to remove some of the pieces from the clock's face.
So, my verdict?
For less than $300 I was pretty impressed with the capabilities of the Maker. Granted it doesn't provide the full functionality of a laser cutter that costs 10 times the price, but for the small shop hobbyist like myself, it more than meets the occasional demands that I would have.
If you want to have something to start out with before moving up to a full-fledged laser cutter, this would be a good place to start.


I greatly appreciate this blog. I wondering if it was possible to use the laser cutter images and you answered my question.
ReplyDelete