A few weeks ago I built a very simple wood stove fan using a couple of computer CPU heat sinks, a TEC wafer, a motor from a CD ROM drive and a home made fan.
At that time I was quite satisfied in how the heat sinks and the TEC were able to provide enough power to drive the motor, however I was just not very satisfied in the design of the fan blade. The fan spun at a good clip, but it just wasn't moving much air. More of a flaw in the design of the fan blades than anything else.
A week later, inspiration hit at my trip to the Surplus store
 |
| The answer to my problems |
A USB powered fan! - The beauty of it this is that looks like a more traditional fan and since it runs on 5 volts from a USB port, the power from our TEC wafer should be able to run it. - Plus it was cheap to boot!
Getting it home, and plugging it into a USB port, it moved a fair amount of air - very promising!
 |
| Nice, but that pink has to go... |
Though it was pink - we needed to address that first...
First order of business was to disassemble all the components of the fan. Thankfully this was very simple matter of removing a few screws
Once the screws have been removed, the wiring to the switches and motor were disconnected by melting the solder connecting them with a soldering iron.
Next it was time to finally eliminate that pink color - a quick coat of brass paint fixed that.
 |
| Bye bye Pink! |
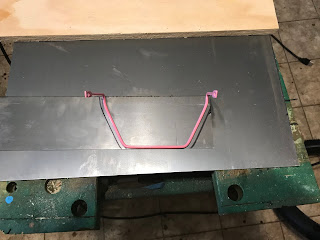
To make the mount, I placed the base of the fan on top of a piece of sheet metal, and traced the outline of the fan base onto the metal.
 |
| Tracing the base to the sheet metal |
I next then cut out the outline of the fan base on the sheet metal
 |
| Test fit of fan mount to heat sink assembly |
Once I was satisfied on how the mount looked I then attached the fan base to the sheet metal mount. To make this attachment I decided to break out my brazing kit and weld the base and mount together.
In the end, it wasn't the nicest looking welding job, but for a guy that works in IT, all things considered, not too horrible.
 |
| Fan mount welded onto the sheet metal |
To complete the mount, I drilled a small hole in the center of the mount to allow for the wiring from the TEC wafer to pass through to the fan.
 |
| Drilling a hole for the wiring |
After giving it a quick coat of brass paint, the mount was ready to be attached to the heat sinks
 |
| Fan mount is ready to attach to the heat sink |
To attach the mount to the heat sink I applied a little bit of JB Weld to the corners of the heat sink, passed the wires for the TEC wafer through the drilled hole of the mount and attached the mount to the heat sink by firmly pressing the mount into the JB Weld.
 |
| Mount is attached to the heat sink |
While the JB Weld cured, I reassembled the fan blade and motor back into its housing and we were ready for final assembly.
 |
| Ready for final assembly |
Final assembly was a very straight forward affair. The fan assembly was reattached to its base with 2 screws and the length of USB cord that was attached to the fan was removed with wire cutters (I made sure I had a few inches of cord hanging out of the fan).
I removed the insulation from the wires for both the fan and the TEC wafer and I soldered the TEC wires to the fan
To make things neater, I wrapped the soldered joints with some electrical tape.
The next step was to test it out
This greatly improved the air out of the fan immensely. It even seems to start up sooner than the previous version. This was a remarkable improvement!
This was a very cheap improvement since you can get USB powered fans from almost any Surplus or Dollar store.
At the end of the day, I spent around 10 dollars in parts and a few hours building this fan.
Considering that I have seen these fans in the stores selling for around 100 dollars, you'll have to forgive me for feeling a bit smug.....


No comments:
Post a Comment